
I decided to start with calibration since it's important for consistent pitch control when driving hardware oscillators with MIDI sent from Ableton Live. Whether you use the Ableton CV Tools pack or Expert Sleepers' Silent Way suite, you'll need to calibrate the tool you use to control hardware oscillators.
The tool I'll discuss in this post is Expert Sleepers' Voice Controller (one of many plugins included in Silent Way), which can be used to generate a calibration profile that it then uses to accurately control the pitch of your hardware VCOs.
In order to control your VCOs from Live, you need a way to get control voltages from your computer to your oscillators. Audio interfaces, being AC-coupled, block steady DC signals, making them unsuitable for sending CV. So you need an intermediary device that's friendly to control voltages.
Enter Expert Sleepers' array of DC-coupled interfaces in Eurorack format. These modules act as a connection point for sending CV signals from your computer to your modular gear. Available connection options include ADAT, S/PDIF, and USB.
I opted for the ES-3 Lightpipe/CV module, which provides eight DC-coupled outputs by way of a Lightpipe (ADAT) connection from my recording interface. These outputs can handle both CV and audio. In this and other posts, you'll see the ES-3 appear in my track outputs, so let's talk a moment about that.
ADAT accommodates eight unidirectional channels of audio or CV. These appear in my system as Outputs 13-20, and I've named them in Live's preferences so that I can easily identify the ES-3. (Side note: This might have you wondering whether it's possible to have eight channels of ADAT inputs to bring audio or CV from your modular into your computer, and the answer is yes, you can.)

Further down this post is a link to a Live calibration set. Keep in mind when you open it that any output numbers that are absent on your system will be greyed out. If there are outputs whose numbers do line up with existing ones on your system, they'll be active with your names, not my names, and they might not be the ones you want to use. So you'll need to consider the screenshots, my words, and your own configuration to tweak the set to work for you.
OK then! Having discussed the intermediate hardware and outputs that'll handle control voltage signals sent from Live to the outside world, let's turn to the software side.
Voice Controller
The Voice Controller plugin includes much more functionality than we'll need for the purposes of this post. And you'll find that there's not much to configure for calibration or for sending pitches and gates to your modular.
As with several other Silent Way plugins, Voice Controller comes in both Instrument and Audio Effect flavors. The Audio Effect type receives VCO calibration audio directly on the plugin's track, and receives MIDI sent to it from a separate track. The Instrument type receives MIDI directly on the plugin's track, and receives VCO calibration audio sent to it from a separate track. Happily, whichever type you use, you can load calibration data that was saved in the other type.
Voice Controller has six virtual outputs, the first two of which are its reserved main outputs to the track on which the plugin sits. As it happens, pitch and gate CVs are sent to the plugin's first two outputs, which means you can load up an instance of Voice Controller, point it to your DC interface and it'll just work.
VCO Calibration
When exactly should you calibrate anyway?
The Silent Way manual recommends doing a separate calibration for each output/VCO combination that might be used since the response of the VCO and the physical output sending CV to the oscillator's V/Oct (or Hz/V) input both play a role in the calibration.
So if you're driving multiple VCOs from Live, you'll have a Voice Controller on each track connected to a VCO, with each instance using its own calibration data.
A typical scenario might include patching up a VCO, calibrating it using Voice Controller, and saving the calibration data for future use. Later when you want MIDI control over that oscillator's pitch, you patch it up, spin up a Voice Controller instance, load the VCO's calibration data for the DC output you're using, and then play away.
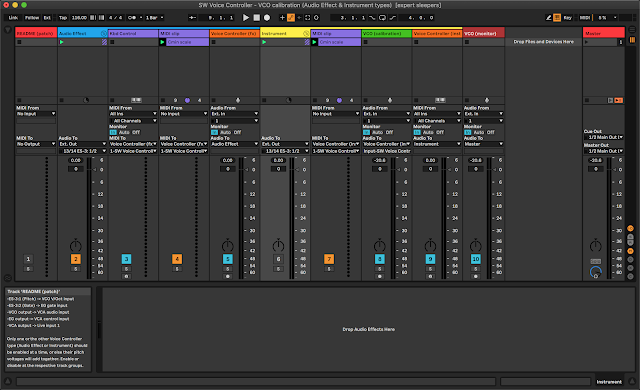
Here's a link to a Live set that's all set up for calibration of a single VCO using both Voice Controller types (Audio Effect and Instrument). Only one or the other should be enabled at a time, or else their pitch voltages will add together. Enable or disable them at the respective track groups. In the screenshot below, the Audio Effect type is enabled.
Live set: SW Voice Controller - VCO calibration (Audio Effect & Instrument types).als
The physical patch for this Live set:
Here's an overview of the patch and signal routing in and out of Live:
Voice Controller's pitch output is sent via ES-3:1 to the oscillator's V/Oct input, and the VCO's output is brought back in to Voice Controller's input. This allows VC to monitor the VCO's response during calibration, which informs the calibration itself. For that reason it's best to avoid running your VCO through any filters or other modifying devices since they can foil the calibration. You'll get best results with a clean basic wave shape.
Voice Controller's gate output is sent via ES-3:2 to the envelope generator controlling the VCA through which the VCO is patched. The EG is mainly there to clamp the VCA closed so that the oscillator isn't blaring away at you during this whole process.
VC's gate stays high during calibration, which should keep your EG open and allow the VCO's signal to find its way back to Voice Controller. That said, depending on your envelope generator's settings, the EG can potentially interfere with the calibration process. If Voice Controller seems unable to calibrate your VCO, you can bypass the EG and VCA altogether and patch an unused oscillator output directly into your audio interface. Direct VCO outputs can be very hot, so I recommend setting its level in Live to around -12dB.
The VCO is brought in on a separate track that sends its output to your monitors so that you can hear what's going on during calibration. There's an included MIDI clip with a simple looping scale that can be used to free up your hands if you need to verify your signal routing or confirm calibration. It exists on a separate track to facilitate switching between the MIDI clip and keyboard control without having to change input monitoring.
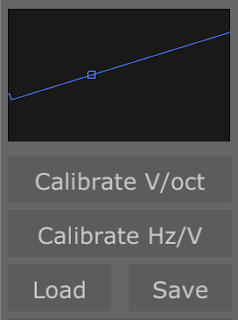
When you're ready, enable the track group for your preferred type (Audio Effect or Instrument), open that Voice Controller instance and press the Calibrate button that corresponds to your synth's response type (V/Oct or Hz/V). You'll hear an ascending series of pitches while Voice Controller gauges the VCO's response. The whole process takes about 10 seconds.
How do you know whether the calibration worked and is correct?
When calibration has completed, you'll see the flat line on the calibration graph change to something else -- possibly an inclined line with some squiggles at one end or the other. If the line remains unchanged, it probably means your VCO's output is failing to make it back to Voice Controller. Double-check the patch and verify that Voice Controller is able to receive your VCO's output: look for a signal on the tiny level meter at the input of the track feeding your chosen Voice Controller instance.
Once you know calibration has occurred, I recommend using your ears to verify that it worked. One of my MIDI controllers has a built-in piano sound that I can hear if I turn up its volume. After calibrating I usually play some scales over a few octaves with the volume adjusted so that I can hear both the piano and the VCO. If it sounds in tune, then it worked. You'll have to decide on a reference that works for you.
This is also a good place to mention that the usable calibrated range may vary from oscillator to oscillator. In my experience, some VCOs are remarkably stable and similar from one to the next in the same make and model; some old oscillators are finicky and only respond to the calibration signal in a certain octave range; and one of my oscillators only responds well depending on the position of its frequency knob. You may have to experiment to find the settings on each VCO that yield the maximum usable range.
The final step is to save the calibration data for later use. When you create a new Voice Controller instance for an output/VCO pairing for which you already have calibration data, you can simply load the saved calibration. An even more efficient method is creating a toolkit set containing calibrated Voice Controller tracks. The calibration data is saved along with the set, so you can copy/paste those tracks into other sets without having to recalibrate or locate saved calibration data.
The next post will dig deeper into how signals are routed from Voice Controller to Live, giving you control over VC's six outputs for sending pitch CVs, gates, envelopes, and triggers.
(Thanks to Os from Expert Sleepers for his feedback on this write-up)
Comments
Post a Comment