
(Updated June 22, 2022)
I'll bet you've had the experience of feeling juicy and inspired to work on music, only to end up spending half a day trying to figure out how to make this talk to that. Or maybe worse, you figured it out at some point but then forgot how you did it the next time you need it. Few things can foil a creative mood like having to troubleshoot, eh?
I've developed a strategy for smoothing this potential wrinkle, which involves a combination of documenting how I've done things and saving configurations in Ableton Live for later re-use. The result is what I call my "toolkit", and it allows me to stay in my creative flow.
That leads right into a Live tip that you may not know about: copying & pasting Tracks between Live sets. Did you know you can do that? Maybe it's obvious to everyone but me, but it totally changed my workflow when I stumbled upon it.
As far as I can tell, this isn't mentioned in the Ableton Live manual. There are related concepts, such as merging sets, exporting sets and creating template sets. But what I'm talking about here is simpler: copying selected Tracks in Session view in one Live set and pasting them into another Live set.
(Update: You can also drag and drop an entire saved set into an already open set. This can be done from either Finder or from the Browser in Live. This is great, since you can do so without having to save and close the existing set in order to open a saved one. All of the tracks from the saved set will be brought into the existing set without disrupting anything. However, if you want to be more selective about what you bring in, read on.)
You can use the standard modifier keys in your operating system of choice to select consecutive Tracks (Shift-click) or non-consecutive Tracks (Command-click in Mac OS). Once you've selected the Tracks you want, use Command-C (or from the menu: Edit / Copy) to copy them to memory. As long as you don't close Live, the Tracks you copied will remain in memory.
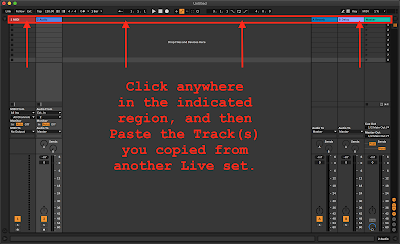
Open a new or existing set and paste the Tracks you copied. This is the only finicky part of the process since you have to click on a certain region of the screen for the paste to work (see screenshot). Click somewhere in the indicated region, which is the area adjacent to the Track names in Session view and which extends for the entire width of the workspace. Then press Command-V (or from the menu: Edit / Paste). Now you can organize the newly pasted Tracks as needed.
(Update: The indicated region -- specifically the middle section above where it says "Drop Files and Devices Here" -- is also where you can drag in another saved set. When you're ready to drop it, move your mouse to that region and you'll see a white line along the right-hand side of the furthest track to the right. That's when you're good to let go.)
All settings in the Tracks you copied will still be present when you paste them into their new home. For audio Tracks that includes Gain/Pan/Send levels; for MIDI Tracks that includes Clips; and for both types it includes input/output settings, Monitor status, Active/Inactive status, and any Info View text you may have included. The only settings not carried over are Record Arm status and Solo/Cue status.
I'm detailing this fairly simple thing because understanding it will be helpful for following along in my future blog posts. You see, I intend to share some Live sets from my toolkit. If all goes as planned, you should be able to download the sets, open them in Live, adjust the inputs/outputs to match your setup, and save the sets as new tools in your kit.
Then, when you need a particular configuration, just copy/paste Tracks from your toolkit (or drag an entire toolkit set) into your other sets.
Here's a sample test session to try: sample-live-set.als
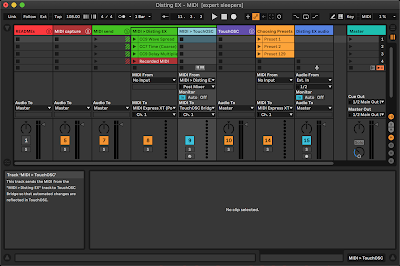
When you open the set in Live, you should see three Tracks called:
- 1 README (see Info View)
- 2 Audio
- 3 MIDI
Enable Info View by toggling the triangle in the lower left corner (or use the ? key). Now when you mouse over the README Track's title bar you should see "This is a test!" in the Info View. (I keep notes and reminders in Info View in many of my saved toolkit sets. I think of them as little love notes to future me.)
The Audio Track has some random Gain/Pan/Send levels set, and Monitoring enabled. The Track's input source is set to Ext. In 6, which might be greyed out if you don't have an external input 6.
The MIDI Track has Monitoring turned off, and it includes one clip called "Clip" with a random melody drawn in. The Track's output is set to IAC Driver (Bus 1), which might be greyed out if it's not configured on your system -- though it should be if you're on a Mac. (If you're on Windows there are some things you're going to have to extrapolate from my blog posts.)
If that all matches what you see, then great! I'd appreciate your feedback in the comments below.
Going forward, I plan to share various things I've figured out over time, like how to control hardware synths, sequencers and vintage drum machines from Live using MIDI or CV, controlling iPad apps from Live, and using iPad apps to control hardware.
I'll explore topics like using Expert Sleepers hardware and software to achieve some of the aforementioned scenarios, working with monome's grid/arc and Ansible, exploring some pretty cool MIDI Moogerfooger capabilities that go beyond what you can do with their front panel controls, and digging into the many MIDI modules and modes in synthesizers.com's offerings.
I hope some of the info and how-tos I'll be sharing will be useful to you too. It's kinda awesome to have a toolkit with preset configurations (sometimes rather complicated ones at that) ready to go. You can easily grab what you need from them for a set in progress, and make this talk to that without interrupting your flow.
Comments
Post a Comment